In this guide
- what’s inside a full cPanel backup, and which parts you need;
- Route A: have OnPoint restore the whole backup for you;
- Route B: restore the website, database, email addresses, messages and forwarders yourself, in 11 steps;
- test the new site before anyone else sees it, then switch over with no downtime.
You’ll need: the backup file, your new OnPoint hosting, and access to wherever your domain is registered. Keep your old hosting running until the very end. The pictures on this page are diagrams; the names in them (mybusiness.co.uk, mybusin) are examples. OnPoint Hosts is run by the same company as The Web Toolbox.
Two ways to do it
cPanel deliberately doesn’t let customers restore a full backup themselves — only the hosting company can, from the server’s admin side. So you either hand the file to OnPoint, or you take it apart and restore each piece with the normal cPanel tools.
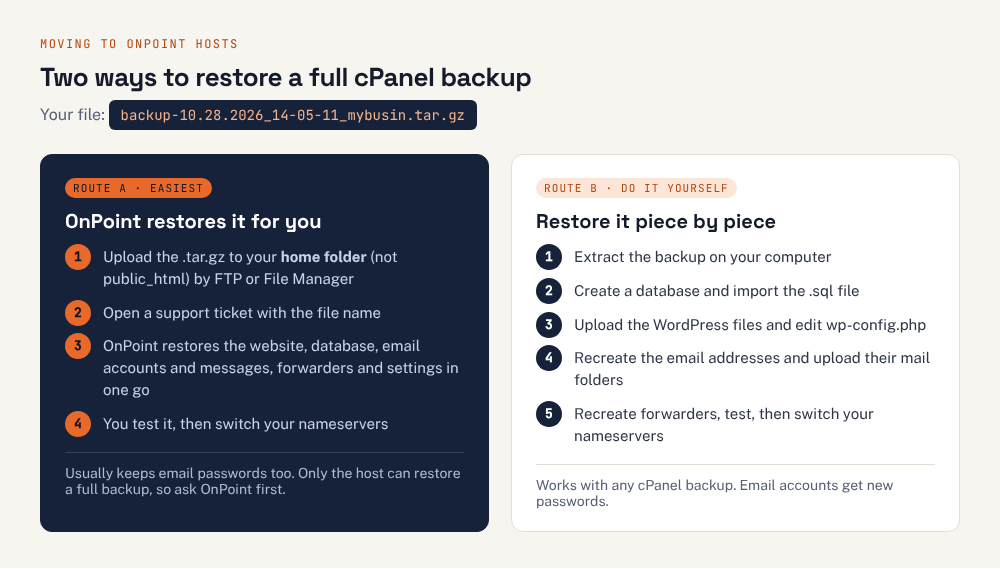
| Route A: OnPoint restores it | Route B: do it yourself | |
|---|---|---|
| Your time | About 15 minutes, plus testing | About 1–2 hours, depending on size |
| Email passwords | Usually kept | New passwords; phones and laptops need updating |
| Best when | The backup is a full cPanel backup and you want everything as it was | You only want some of it, or want to tidy up as you go |
Before you start (both routes)
Order your OnPoint hosting with your existing domain. On the Choose a Domain screen pick “I will use my existing domain and update my nameservers” — and don’t change the nameservers yet. You’ll do that last, once everything is tested.
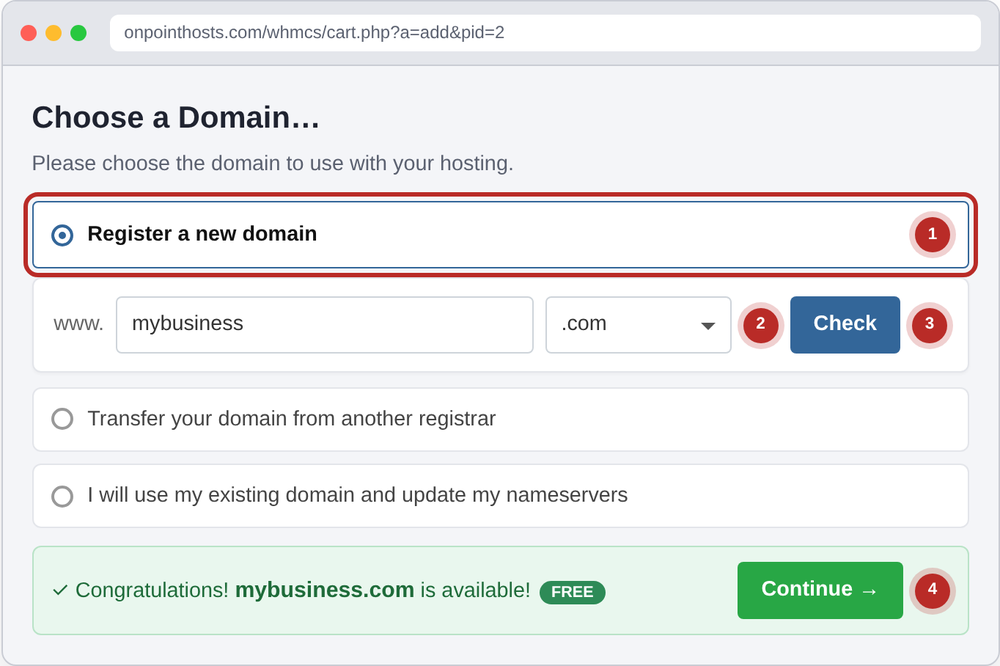
Choose “use my existing domain” when you order. Your domain keeps pointing at the old host until you’re ready. Make a fresh backup on your old host if yours is more than a day or two old: cPanel Files Backup › Download a Full Account Backup. The file is called something like
backup-10.28.2026_14-05-11_mybusin.tar.gz.Check the size. Your OnPoint plan needs room for the backup and the restored site while you work — roughly twice the file size. Beginner includes 10 GB, Plus 20 GB, Ultimate unlimited.
Write down your email addresses and the devices that use them — you’ll need to update those devices later.
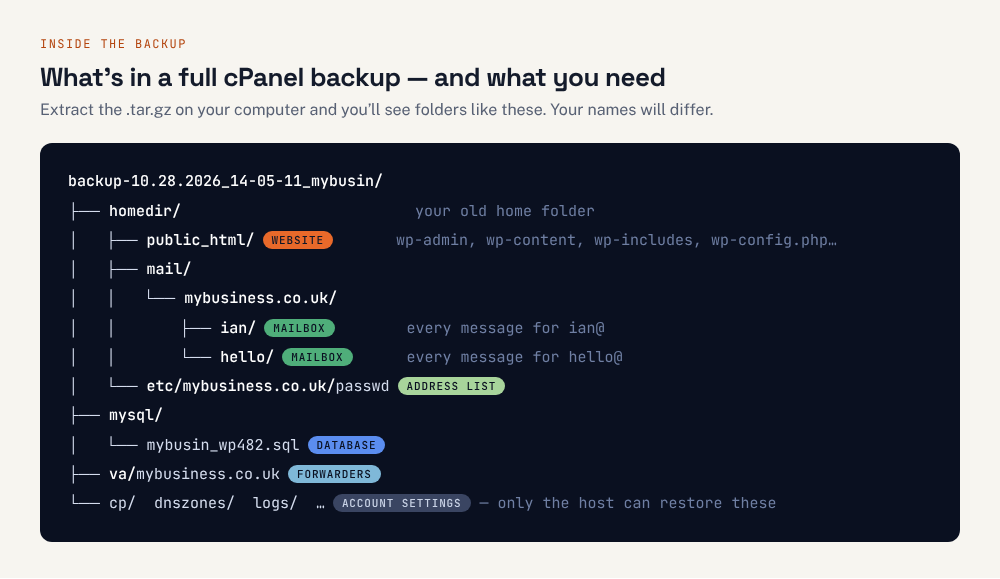
What’s inside the backup
Route A: let OnPoint restore it
Upload the backup to your home folder. In FileZilla, connect with your main cPanel login and drop the file into the top folder you land in — not into
public_html, where anyone could download it. For a large file FTP is much more reliable than a browser. FileZilla settingsOpen a support ticket. Contact OnPoint support and include: your domain, the backup’s exact file name, that it’s a full cPanel backup, and that you want the website, databases and email restored. Ask them to confirm how they’ll restore it — for example whether your new account will be replaced by the one in the backup — and how long it will take.
Wait for confirmation, then jump to step 9: test with your hosts file and continue from there.
Route B: restore it yourself, step by step
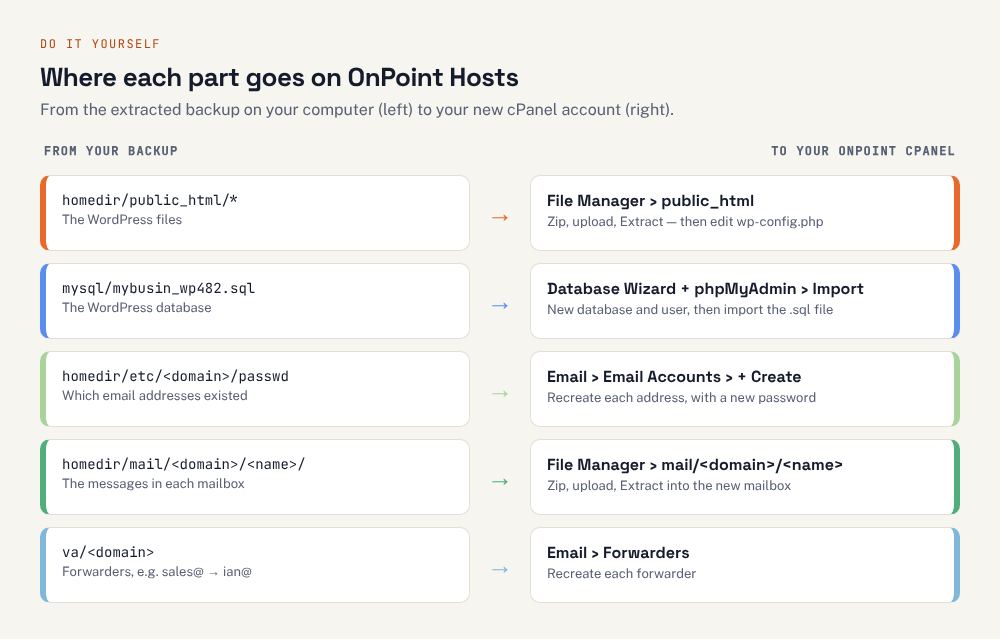
Step 1: Unpack the backup on your computer
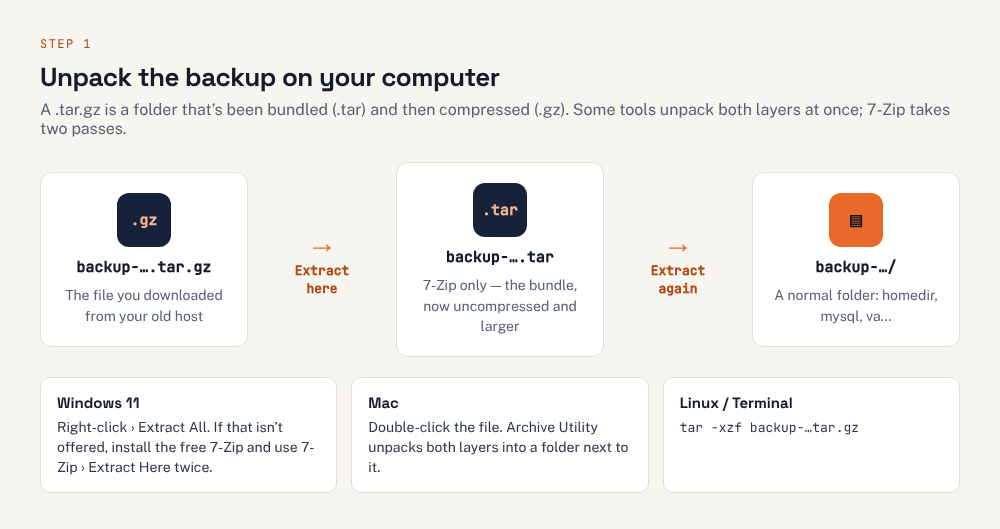
Unpack it somewhere with plenty of space, such as a new folder on your desktop. You should end up with a folder containing homedir, mysql and several others.
Step 2: Note the old settings
Open these files from the unpacked backup in a text editor (Notepad, TextEdit or a code editor) and note down what you find:
homedir/public_html/wp-config.php— the$table_prefixline (oftenwp_). You won’t change it; you just need to know it.mysql/— the.sqlfile whose name matchesDB_NAMEin wp-config.php. That’s your WordPress database. Ignore any others you don’t recognise.homedir/etc/mybusiness.co.uk/passwd— one line per email address; the part before the first colon is the name before the @.va/mybusiness.co.uk— your forwarders, one per line, such assales@mybusiness.co.uk: ian@mybusiness.co.uk.dnszones/mybusiness.co.uk.db— only if you added your own DNS records on the old host (for example to verify with Google, or for Microsoft 365). Look for TXT, CNAME or MX records you recognise; you’ll add them again in cPanel Domains Zone Editor.
Step 3: Create a new database and user
In your OnPoint cPanel, open cPanel Databases Database Wizard, create a database (for example wp) and a user (for example wpuser) with a generated password, and give the user ALL PRIVILEGES. Note the full names with your new prefix — such as mybusin_wp and mybusin_wpuser — and the password. Database Wizard step by step
Step 4: Import the database
Open cPanel Databases phpMyAdmin and select your new database in the list on the left.
Open the Import tab, choose the
.sqlfile from the backup’smysqlfolder, and select Import.When it finishes, you should see the WordPress tables on the left:
wp_options,wp_posts,wp_usersand so on (with your prefix).
Step 5: Upload the WordPress files and point them at the new database
On your computer, open the backup’s
homedir/public_htmlfolder, select everything inside it (including.htaccess) and compress it tosite.zip.In cPanel, open cPanel Files File Manager, go into
public_html, delete any placeholder page that’s there, then Uploadsite.zip. For more than a few hundred megabytes, upload it with FileZilla instead.Select
site.zip, choose Extract, extract into/public_html, then delete the zip.Select
wp-config.php, choose Edit, and change the database lines to the details from step 3:
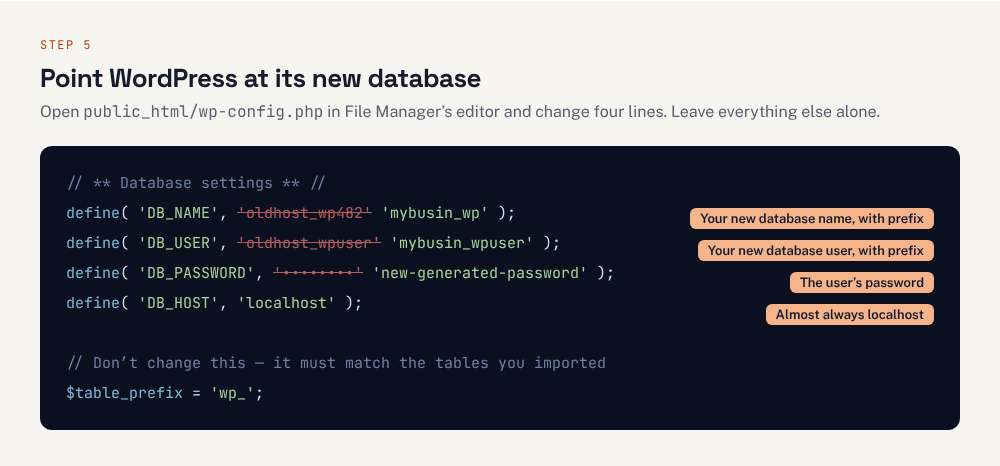
define( 'DB_NAME', 'mybusin_wp' );
define( 'DB_USER', 'mybusin_wpuser' );
define( 'DB_PASSWORD', 'the-password-from-step-3' );
define( 'DB_HOST', 'localhost' );
Select Save Changes. If your site used a different domain or address on the old host (for example a temporary address), you’ll also need to update it inside the database — the troubleshooting table explains how.
Step 6: Recreate your email addresses
Open cPanel Email Email Accounts and create each address from your list in step 2, spelled exactly the same. Give each one a strong new password and a storage limit at least as big as the old mailbox. Creating an email account
Step 7: Copy each mailbox’s messages across
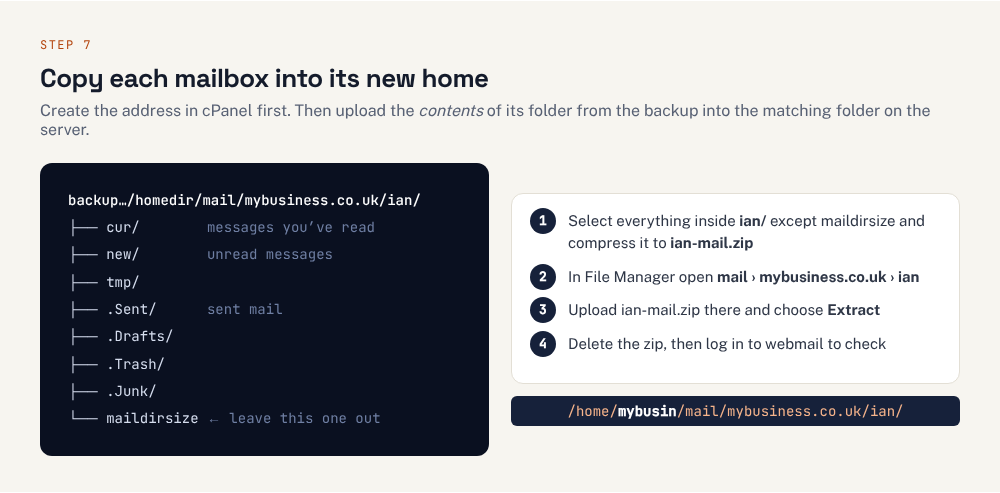
On your computer, open
homedir/mail/mybusiness.co.uk/ianin the backup. Select everything inside it except the file calledmaildirsize(cPanel works that out again itself) and compress it toian-mail.zip.In File Manager, open Settings and tick Show Hidden Files (dotfiles). Then go to
mail›mybusiness.co.uk›ian— the folder cPanel created in step 6.Upload
ian-mail.zipthere, select it, choose Extract and allow it to overwrite. Then delete the zip.Log in to webmail (
https://mybusiness.co.uk/webmailwon’t work until the switch, so use Check Email in Email Accounts) and check the inbox and Sent folder are full.
Step 8: Recreate forwarders and DNS records
Add each forwarder from your list in cPanel Email Forwarders (how), and any custom DNS records you noted in cPanel Domains Zone Editor. Don’t copy the old host’s nameserver, A or MX records — OnPoint’s are already correct.
Step 9: Test the new site before anyone else sees it
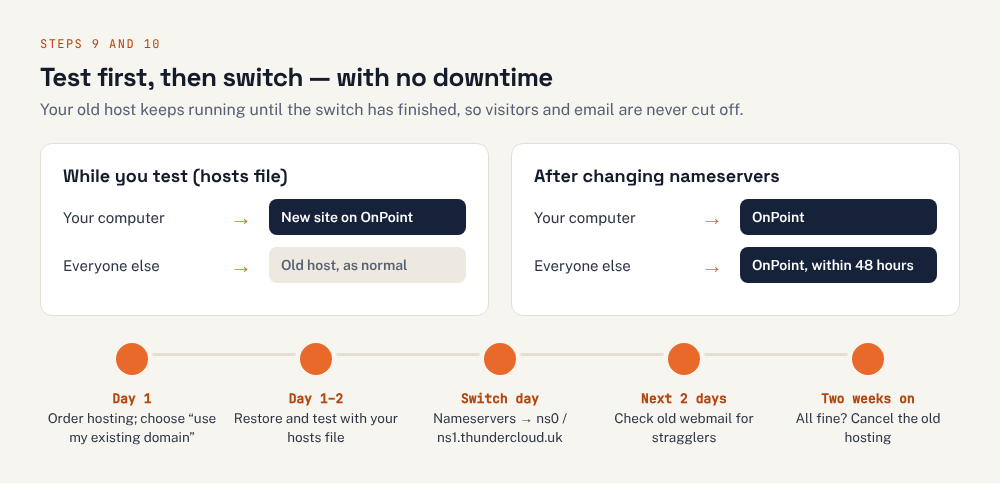
Your domain still points at the old host, so to see the copy on OnPoint you tell your computer only where to look, using its hosts file.
Find your server’s IP address: in cPanel it’s shown as Shared IP Address under General Information on the home screen.
Open your hosts file with administrator rights:
- Windows: search for Notepad, right-click › Run as administrator, then open
C:\Windows\System32\drivers\etc\hosts(choose All files in the file-type box). - Mac: open Terminal and type
sudo nano /etc/hosts, then your Mac password.
- Windows: search for Notepad, right-click › Run as administrator, then open
Add one line at the bottom with the IP address and your domain, then save:
hosts — use your server’s IP address 203.0.113.25 mybusiness.co.uk www.mybusiness.co.ukOpen your site in a private browser window. Click through the pages, log in to
/wp-admin, submit the contact form and check images load.Remove the line again and save once you’re happy — otherwise your computer will keep ignoring the real DNS.
Step 10: Switch your domain to OnPoint
Log in to the company where your domain is registered (often your old host) and change its nameservers to
ns0.thundercloud.ukandns1.thundercloud.uk. Or transfer the domain to OnPoint so everything is in one place.Within a few hours most visitors reach OnPoint; allow up to 48 hours for everyone. Your site works throughout — people simply see the old or new copy.
Catch the stragglers. Email sent during the changeover can still land on the old server. For two or three days, log in to the old host’s webmail and move anything new across — forward it to yourself, or add both accounts to a mail app and drag the messages over.
Update every phone and computer with the new email passwords (Route B). The settings are on Connect Devices; device set-up.
Step 11: Tidy up
- Check the padlock in cPanel Security SSL/TLS Status a few hours after the switch.
- Check your PHP version in MultiPHP Manager matches what the site needs, ideally 8.4 or 8.5. Your PHP version
- Update WordPress, plugins and themes, and clear any caching plugin’s cache.
- Delete the backup file and any zip files from the server — they contain all your data and use up space.
- Keep the old hosting for about two weeks, then download one last backup and cancel it.
Troubleshooting
| Problem | Fix |
|---|---|
| “Error establishing a database connection” | The details in wp-config.php don’t match step 3. Check the full names with the new prefix, the password, and that the user was added to the database. |
| “There has been a critical error” or a blank page | Often a security or caching plugin with the old server’s folder path saved in a file such as .user.ini or wordfence-waf.php. Check cPanel Metrics Errors for the file name; edit the path to /home/your-new-username/…, or rename the plugin’s folder in wp-content/plugins to switch it off. |
| The site redirects to a different or old address | The address stored in WordPress differs. In phpMyAdmin open wp_options and set siteurl and home to https://mybusiness.co.uk. If the whole domain changed, use a search-and-replace plugin such as Better Search Replace afterwards to update links in your content. |
| Pages other than the home page show “Not Found” | The .htaccess file didn’t come across. In WordPress go to Settings › Permalinks and select Save Changes to recreate it. |
| The database import stops part-way | The file is too big for the upload limit — compress it, or ask OnPoint support to import it. Then empty the database and import again, so you don’t end up with half the tables. |
| A mailbox shows no messages | The files went into the wrong folder. Check that cur and new sit directly inside mail/yourdomain/name/, not one level deeper. |
| Email stopped working after the switch | Check the nameservers have changed, then the MX record in Zone Editor points at your own domain (not the old host), and that devices use the new password. |
Not sure which route to take, or stuck halfway? Open a ticket with OnPoint’s UK support team — mention that you’re moving from a cPanel backup and which step you’ve reached.